Tutorial
Introduction
In this tutorial you learn how to use the XPay KotlinUtils SDK with your Android application.
The Example app for this tutorial is a simplified shoe store which consists of a single product activity and four other activities for the checkout process.
What you should already know
This codelab is written for programmers and assumes that you know either the Java or Kotlin programming language. If you are an experienced programmer and adept at reading code, you will likely be able to follow this codelab, even if you don't have much experience with Kotlin.
You should understand the general software development process for Android apps using Android Studio.
What you'll learn
- How to install KotlinUtils in an Android application.
- How to use XpayUtils properties and methods to build the checkout process and process payments online.
What you'll do
- Clone the example app code.
- Explore the project layout.
- Run the app on virtual or physical devices.
- Include and use KotlinUtils using the example codes included here.
- Run the app and test a complete payment cycle on XPay testing server.
Project code
Checkout example-start branch for the starter code and example-completed branch for the complete code including the code snippets found here.
Project layout
Open the project in Android studio and check out the files inside java/com.xpay.kotlin
You will find 5 Kotlin or Java files that contains logic for each activity in our app.
below is a description for each one:
- ProductActivity is the main activity and it simulates a product page in a shoe store app.
- UserInfoActivity is the first activity in the checkout process that is responsible for getting the user billing information and choosing the payment method
- PaymentPreviewActivity is the second activity in the checkout process that is responsible for displaying a preview of the payment and displaying the Credit Card form in the case of card payment
- CashPaymentActivity is the third activity in the checkout process (in case of Kiosk/Cash collection) that is responsible for displaying payment refrence number to the user
- TransactionActivity is the fifth activity that is responsible for displaying transaction information for the user
Run The app
After you explored the project code and made yourself comfortable with it, go ahead and run it either on an emulator or your physical device
After the app build and run you will see the fake product page on the main screen, go ahead and explore it then try to click the checkout button at the end of the screen you will find that it does nothing.

in the upcoming sections we are going to edit the ProductActivity code to start the checkout process but first let's install KotlinUtils in our app.
1. Prepare for the checkout process
Let's start implementing the checkout process. First, We need to set our credentials.
Open ProductActivity inside the java folder.
Go to
onCreatefunction and add the following code between the the commented lines01-startand01-end.
- Kotlin
- Java
// set XpayUtils core settings
XpayUtils.apiKey = "Cce74Y3B.J0P4tItq7hGu2ddhCB0WF5ND1eTubkpT"
XpayUtils.communityId = "m2J7eBK"
XpayUtils.apiPaymentId = 60
// set XpayUtils core settings
XpayUtils.INSTANCE.setApiKey("Cce74Y3B.J0P4tItq7hGu2ddhCB0WF5ND1eTubkpT");
XpayUtils.INSTANCE.setCommunityId("m2J7eBK");
XpayUtils.INSTANCE.setApiPaymentId(60);
The Above code sets the required settings to start using XpayUtils which are:
info
since XpayUtils is a singelton class, it's instance is created after the first access to any of it's properties or methods.
Now, let's start the checkout process by calling prepareAmount() method with the total amount of the cart.
- Go to the end of
onCreatefunction and add the following code between the the commented lines02-startand02-end.
- Kotlin
- Java
lifecycleScope.launch {
  try {
    dialog?.show()
    XpayUtils.prepareAmount(totalAmount)
    goToCheckout()
  } catch (e: Exception) {
    dialog?.hide()
    e.message?.let { it1 -> displayError(it1) }
  }
}
XpayUtils.INSTANCE.prepareAmount(totalAmount, prepareCallback);
The above code will get called when the checkout button is clicked, it does the following:
Show up loading screen.
Call
prepareAmount()method with the total amount of the user's cart which if successfull does the following:- Get the active payment methods available to your community and set them in activePaymentMethods.
- Get the total amount including fees(if any) for each active payment method and set them in PaymentOptionsTotalAmounts.
- Return PrepareAmountData object which represents the total amount including fees (if any) for each active payment method.
If the request is successfull call
goToCheckout()function which for now it just:- Hide the loading screen
- Navigates to UserInfoActivity activity.
If an exception occured,
- Hide the loading screen
- Call
displayError(res)function with the result which displays the error message in a Toast.
note
XpayUtils.prepareAmount() is a suspend function, it has to run inside a Coroutine/Async Scope.
2. Adding custom fields
If you want to save extra information with the transaction in XPay servers like in this example, the color and size chosen, You can do so using custom fields methods.
Go to the goToCheckout function definition and add the following code between the the commented lines that says 03-start and 03-end.
- Kotlin
- Java
XpayUtils.addCustomField("color", color)
XpayUtils.addCustomField("size", size)
XpayUtils.INSTANCE.addCustomField("color", color);
XpayUtils.INSTANCE.addCustomField("size", size);
The above code does the following:
- Add the value of the chosen color stored in the
colorvariable as a custom field with a key value of "color" - Add the value of the chosen size stored in the
sizevariable as a custom field with a key value of "size"
Try to run the app again and click on the checkout button in the first activity.

Now when you click on the checkout button, you see the loading windows shows up while making the request then it takes you to the checkout activity where the user submit his billing info and choose payment method. But you will find that the payment options dropdown is empty.
In the next section you will populate the empty dropdown with the available payment methods.
3. Display active payment methods
Now it's time to read the avilable payment methods to your community and pass them to the payment options dropdown so the user can choose one of them.
Go to UserInfoActivity inside the java folder.
Go to
onCreatefunction and add the following code between the the commented lines01-startand01-end.
- Kotlin
- Java
// Populate paymentMethodsDropdown with available active payment methods
val paymentMethodsAdapter: ArrayAdapter<String>?
val paymentMethodsList: MutableList<String> = mutableListOf()
// get the available active payment methods and convert it to List<String>
for (paymentMethod in XpayUtils.activePaymentMethods) {
    paymentMethodsList.add(paymentMethod.toString())
}
paymentMethodsAdapter = paymentMethodsList.distinct().toList().let {
    ArrayAdapter(
        this, android.R.layout.simple_spinner_item, it
    )
}
paymentMethodsAdapter.setDropDownViewResource(android.R.layout.simple_spinner_dropdown_item)
paymentMethodsDropdown.adapter = paymentMethodsAdapter
// Populate paymentMethodsDropdown with available active payment methods
ArrayAdapter<String> adapter = null;
List<String> paymentMethodsList = new ArrayList<String>();
// get the available active payment methods and convert it to List<String>
for (PaymentMethods i : mSpinnerData) {
  paymentMethodsList.add(i.toString());
}


Set<String> set = new LinkedHashSet<>(paymentMethodsList);
paymentMethodsList.clear();
paymentMethodsList.addAll(set);

// Populate paymentMethodsDropdown with available active payment methods
adapter = new ArrayAdapter<String>(this, android.R.layout.simple_spinner_item, paymentMethodsList);
adapter.setDropDownViewResource(android.R.layout.simple_spinner_dropdown_item);
paymentMethodsDropdown.setAdapter(adapter);
The above code will get called when the activity is created, it does the following in order:
- Read the available payment methods found in
XpayUtils.activePaymentMethodsafterprepareAmount()method was called. - Converts the available payment methods found in
XpayUtils.activePaymentMethodsto a list of String values. - Pass the converted list to the paymentMethodsDropdown adapter so it's shown in the payment method dropdown.
4. Set Payment method
Navigate to the overriden onItemSelected function and add the following code between the the commented lines 02-start and 02-end.
- Kotlin
- Java
when (XpayUtils.activePaymentMethods[position]) {
  PaymentMethods.CASH -> {
      totalAmount = XpayUtils.PaymentOptionsTotalAmounts?.cash!!
      XpayUtils.payUsing = PaymentMethods.CASH
      showView(constraint_shipping)
  }
  PaymentMethods.CARD -> {
      totalAmount = XpayUtils.PaymentOptionsTotalAmounts?.card!!
      XpayUtils.payUsing = PaymentMethods.CARD
      hideView(constraint_shipping)
  }
  PaymentMethods.KIOSK -> {
      totalAmount = XpayUtils.PaymentOptionsTotalAmounts?.kiosk!!
      XpayUtils.payUsing = PaymentMethods.KIOSK
      hideView(constraint_shipping)
  }
}
totalAmount = String.format("%.2f", totalAmount).toDouble()
totalAmountTxt.text = "Total Amount: ${totalAmount} Egp"
case CASH: {
  amount = Objects.requireNonNull(XpayUtils.INSTANCE.getPaymentOptionsTotalAmounts()).getCash();
  XpayUtils.INSTANCE.setPayUsing(PaymentMethods.CASH);
  showView(parent);
  break;
}
case CARD: {
  amount = Objects.requireNonNull(XpayUtils.INSTANCE.getPaymentOptionsTotalAmounts()).getCard();
  XpayUtils.INSTANCE.setPayUsing(PaymentMethods.CARD);
  hideView(parent);
  validForm = true;
  break;
}
case KIOSK: {
  amount = Objects.requireNonNull(XpayUtils.INSTANCE.getPaymentOptionsTotalAmounts()).getKiosk();
  XpayUtils.INSTANCE.setPayUsing(PaymentMethods.KIOSK);
  hideView(parent);
  validForm = true;
  break;
}
}
amount = Double.parseDouble(String.format("%.2f", amount));
totalAmount.setText("Total Amount: " + amount + " Egp");
The above code is called whenever the user chooses a payment method from the payment methods dropdown, it does the following:
- Sets the payment method chosen in
XpayUtils.payUsingproperty. - Displays the total amount that will be paid for the payment method chosen from
XpayUtils.PaymentOptionsTotalAmountsproperty. - Show Shipping information form if cash collection method was chosen, and hide it otherwise.
Try to run the app again and click on the checkout button in the first activity.

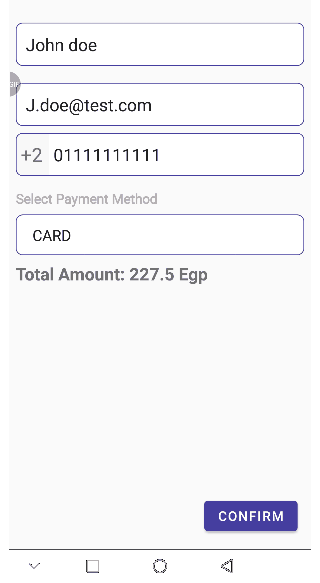
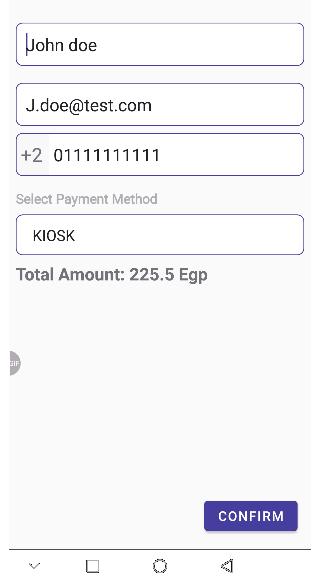
Now when you go to UserInfoActivity, you will notice that the payment methods dropdown have three options; card, cash, and kiosk. each time you choose a different payment method the total amount in the text below will change accordingly.
You can also see that the shipping information form appears when you use cash as the payment method. It is useless for now but in the next section you will populate it's city and state dropdowns with values.
5. Populate city-state values
- Go to the commented lines
03-startand03-endinsideonCreatefunction and add the following code
- Kotlin
- Java
// get the value of countries-cities combinations from assets
val jsonFileString = getJsonDataFromAsset(applicationContext, "countries.json")
val obj = JSONObject(jsonFileString!!)

val countriesList = populateCountries(obj)
}
JSONObject obj = new JSONObject();
String jsonFileString = getJsonDataFromAsset(this, "countries.json");
try {
  assert jsonFileString != null;
  obj = new JSONObject(jsonFileString);
} catch (JSONException e) {
  e.printStackTrace();
}
List<String> finalAllCountries = populateCountries(obj);
JSONObject finalObj = (JSONObject) obj;
The above code does the following:
- Read the
countries.jsonfile from assets which contains the city-state combination - call
populateCountries(obj)method which:- return a list of type string that represents the cities
- pass the list to the cities dropdown adapter
- Go to the commented lines
04-startand04-endinsideonCreatefunction and add the following code
- Kotlin
- Java
populateStates(obj, countriesList[position])
populateStates(finalObj, finalAllCountries.get(i));
The above code does the following:
- When the user selects a city, it calls
populateStates()method which:- Get a list of type string that represents the states that belongs to the city chosen
- pass the states list to the state dropdown adapter
Try to run the app again and click on the checkout button in the first activity.
Now when you go to UserInfoActivity, select cash as the payment method.
when the shipping information form appears you can now select a city state combination using the values in the dropdowns.
6. Validate billing info and preview payment information
Now it's time to validate the billing info before submitting a payment request.
- Go to the commented lines
05-startand05-endinsideonCreatefunction and add the following code
- Kotlin
- Java
var validShippingInfo: Boolean = true
if (constraint_shipping.visibility == View.VISIBLE) {
  if (validateShippingInfo()) {
    validShippingInfo = true
    // set payment shipping info
    XpayUtils.ShippingInfo = ShippingInfo(
        "EG",
        sp_state.selectedItem.toString(),
        sp_country.selectedItem.toString(),
        et_apartment.text.toString(),
        et_building.text.toString(),
        et_floor.text.toString(),
        et_street.text.toString()
    )
  } else validShippingInfo = false
}

if (validateBillingInfo() && validShippingInfo) {
// set payment billing info
try {
  XpayUtils.billingInfo =
    BillingInfo(
      userName.text.toString(),
      userEmail.text.toString(),
      "+2${userPhone.text}"
    )
  val intent = Intent(this, PaymentPreviewActivity::class.java)
  intent.putExtra("TOTAL_AMOUNT", totalAmount.toString())
  startActivity(intent)
} catch (e: Exception) {
  e.message?.let { it1 -> Toast.makeText(this, it1, Toast.LENGTH_LONG).show() }
}
}
boolean validShippingInfo = true;
if (parent.getVisibility() == View.VISIBLE) {
  if (validateShippingInfo()) {
    validShippingInfo = true;
    // set payment shipping info
    XpayUtils.INSTANCE.setShippingInfo(new ShippingInfo(
      "EG",
      state.getSelectedItem().toString(),
      country.getSelectedItem().toString(),
      apartment.getText().toString(),
      building.getText().toString(),
      floor.getText().toString(),
      street.getText().toString()
  ));
  } else validShippingInfo = false;
}

if (validateBillingInfo() && validShippingInfo) {
  // set payment billing info
  try {
    XpayUtils.INSTANCE.setBillingInfo(new BillingInfo(name.getText().toString(), email.getText().toString(), "+2" + phone.getText().toString()));
    Intent intent = new Intent(getApplicationContext(), PaymentPreviewActivity.class);
    intent.putExtra("TOTAL_AMOUNT", amount.toString());
    startActivity(intent);
  } catch (Exception e) {
    Toast.makeText(getApplicationContext(), e.getMessage(), Toast.LENGTH_LONG).show();
  }
}
The above code is called when the submit button in UserInfoActivity is clicked, it does the following:
Define and set a var
validShippingInfototrueChecks if the shipping form is visible:
- If true it checks the return value of
validateShippingInfo()method which checks that non of the shipping information ofrm values are not empty:- if true, sets
XpayUtils.ShippingInfoproperty usingShippingInfodata class - if false, it sets
validShippingInfotofalse
- if true, sets
- If true it checks the return value of
Checks the return value of
validateBillingInfo()method andvalidShippingInfovar- if true, set
XpayUtils.userInfoproperty usingUserdata class and start a PaymentPreviewActivity
- if true, set
validateBillingInfo() method does nothing more than check that the values in the billing information is not empty.
We recommend implementing your own verification logic that checks that the billing informations follow the Regex patterns found here.
7. Review Payment information
Now it's time you show the user a preview of the payment information he provided before taking him to the final step which is payment.
Open PaymentPreviewActivity inside the java folder.
Go to
onCreatefunction and add the following code between the the commented lines01-startand01-end.
- Kotlin
- Java
textName.text = "Name: \n${XpayUtils.billingInfo!!.name}"
textEmail.text = "Email: \n${XpayUtils.billingInfo!!.email}"
txtPhone.text = "Phone: \n${XpayUtils.billingInfo?.phone}"
txtMethod.text = "Payment Method: \n${XpayUtils.payUsing}"
totalAmount.text = "Total Amount: \n${intent.getStringExtra("TOTAL_AMOUNT")?.toDouble()}"
txt_name.setText("Name: \n" + XpayUtils.INSTANCE.getBillingInfo().getName());
txt_mail.setText("Email: \n" + XpayUtils.INSTANCE.getBillingInfo().getEmail());
txt_phone.setText("Phone: \n" + XpayUtils.INSTANCE.getBillingInfo().getPhone());
txtcomm_id.setText("Community Id: \n" + XpayUtils.INSTANCE.getCommunityId());
txt_varid.setText("Variable amount: \n" + XpayUtils.INSTANCE.getApiPaymentId());
txt_method.setText("Payment method: \n" + XpayUtils.INSTANCE.getPayUsing());
txt_total.setText("Total Amount: \n" + getIntent().getStringExtra("TOTAL_AMOUNT"));
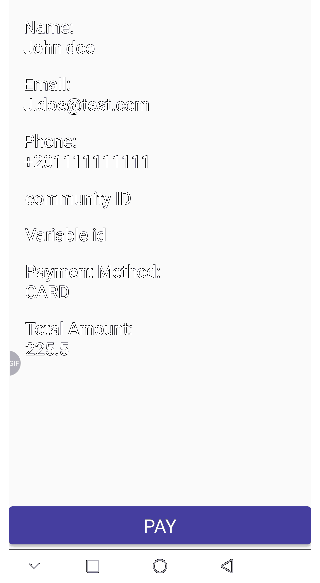
The above code sets each text box in the PaymentPreviewActivity corresponding layout
to the values you set before for the billing information in the previous section using XpayUtils.userInfo and XpayUtils.payUsing
Try to run the app again go to UserInfoActivity, click on the confirm button.
You will be navigated to the PaymentPreviewActivity which will display the payment information submitted and the total amount to be paid.

- go between the commented lines
02-startand02-endand add the following code.
- Kotlin
- Java
try {
  dialog!!.show()
  GlobalScope.launch {
  val response = XpayUtils.pay()
  response?.let { completePayment(response) }
}
} catch (e: Exception) {
  dialog?.dismiss()
  e.message?.let { it1 -> Toast.makeText(this, it1, Toast.LENGTH_LONG).show() }
}
try {
  dialog.show();
  XpayUtils.INSTANCE.pay(payCallback);
} catch (Exception e) {
  Toast.makeText(PaymentPreviewActivity.this, e.getMessage(), Toast.LENGTH_SHORT).show();
}
The above code will get called when the PAY button is clicked, it does the following:
- Show up loading screen.
- Call
paymethod to start processing the payment. - If the request is successfull call
completePayment()function with the response which for now it just:- Hide the loading screen
- If an exception occured,
- Hide the loading screen
- displays the error message in a Toast.
note
XpayUtils.pay() is a suspend function it has to run inside a Coroutine/Async Scope.
8. Payment
Now it's time to build the final payment step in the checkout process.
- Go to
completePayment(response: PayData)function and add the following code between the the commented lines03-startand03-end.
- Kotlin
- Java
if (response.iframe_url != null) {
  // if iframe_url inside the returned response is not null, launch a web view to display the payment form
  isCardPayment = true
  uuid = response.transaction_uuid
  // start a web view and navigate the user to the credit card form
  val builder = CustomTabsIntent.Builder()
  builder.setToolbarColor(resources.getColor(R.color.colorPrimary))
  builder.setShowTitle(true)
  val customTabsIntent: CustomTabsIntent = builder.build()
  customTabsIntent.launchUrl(this@PaymentPreviewActivity, Uri.parse(response.iframe_url))
} else if (response.message != null) {
  // if iframe_url inside the returned response is null while the message is not null
  // this is a kiosk or cash collection payment, just display the message to the user
  isCardPayment = false
  val intent = Intent(baseContext, CashPaymentActivity::class.java)
  intent.putExtra("UUID", response.transaction_uuid)
  intent.putExtra("MESSAGE", response.message)
  startActivity(intent)
  }
if (response.getIframe_url() != null) {
  // if iframe_url inside the returned response is not null, launch a web view to display the payment form
  isCardPayment = true;
  uuid = response.getTransaction_uuid();
  // start a web view and navigate the user to the credit card form
  CustomTabsIntent.Builder builder = new CustomTabsIntent.Builder();
  builder.setToolbarColor(R.color.colorPrimary);
  builder.setShowTitle(true);
  CustomTabsIntent customTabsIntent = builder.build();
  customTabsIntent.launchUrl(this, Uri.parse(response.getIframe_url()));
} else if (response.getMessage() != null) {
  // if iframe_url inside the returned response is null while the message is not null
  // this is a kiosk or cash collection payment, just display the message to the user
  isCardPayment = false;
  Intent intent = new Intent(this, CashPaymentActivity.class);
  intent.putExtra("UUID", response.getTransaction_uuid());
  intent.putExtra("MESSAGE", response.getMessage());
  startActivity(intent);
}
The above code does the following:
Checks if the iframe_url value of the response passed
- If not null, then this is is a credit card payment:
- set
isCardPaymenttotrue. - setup a web view using Custom tabs.
- Start the web view and Navigate to the credit card form using the value found inside
iframe_url.
- set
- If null, check if the
messagevalue of the response passed- If not null, then this is a kiosk/cash collection payment:
- set
isCardPaymenttofalse. - create an Intent for the CashPaymentActivity
- pass
transaction_uuidandmessagevalues of the response to the intent. - start to CashPaymentActivity which displays the response message content.
- set
- If not null, then this is a kiosk/cash collection payment:
Try to run the app again and follow the checkout cycle till you click the PAY button.
If you chose KIOSK or cash collection payment method, you will be redirected to PaymentPreviewActivity which will display the response message.
If you chose card payment method, you will be redirected to credit card form.
You can use the testing credit card information found here in the form.
When you submit the credit card information it will take you to a ACS emulator form, ignore that and press submit again.
9. Getting Transaction details
Later on, you might need to show the user details about his past transactions, whether to check on the transaction status or get other info like total amount paid or even the custom fields that was saved with the transaction.
You can get a transaction details using XpayUtils.getTransaction(transactionUuid: String) method and the transaction UUID.
We will implement this method in our app so that when the user closes the web view of the credit card form, It navigates him to the TransactionActivity which shows him the current transaction status as well as other information.
Go to PaymentPreviewActivity inside the java folder.
Go to
onRestart()function and add the following code between the the commented lines04-startand04-end.
- Kotlin
- Java
if (isCardPayment) {
  val intent = Intent(this, TransactionActivity::class.java)
  intent.putExtra("UUID", uuid)
  startActivity(intent)
}
if (isCardPayment) {
  Intent intent = new Intent(this, TransactionActivity.class);
  intent.putExtra("UUID", uuid);
  startActivity(intent);
}
The above code does the following:
Check if the isCardPayment is true and if so:
- create an Intent for the TransactionActivity.
- pass
transaction_uuidvalue of the response to the intent. - Go to TransactionActivity.
info
onRestart function gets triggered when the the user closes the web view (when the current activity is being re-displayed to the user)
Read more about it here
Go to TransactionActivity inside the java folder.
Go to
onStart()function and add the following code between the commented lines01-startand01-end.
- Kotlin
- Java
uuid = intent.getStringExtra("UUID")
uuid?.let { loadTransaction(it) }
loadTransaction(uuid);
The above code does the following:
- Get the value of the UUID passed to the intent.
- call
loadTransaction()function with the value of the UUID
- Go to
loadTransaction()function and add the following code between the the commented lines02-startand02-end.
- Kotlin
- Java
lifecycleScope.launch {
  try {
    dialog?.show()
    Uid.let { it ->
      val res = XpayUtils.getTransaction(it)
      res?.let { updateTransaction(it) }
    }
  } catch (e: Exception) {
    dialog?.dismiss()
    e.message?.let { displayError(e.message.toString()) }
  }
}
dialog.show();
try {
  XpayUtils.INSTANCE.getTransaction(Uid, TransactionCallback);
} catch (Exception e) {
  dialog.dismiss();
  runOnUiThread(new Runnable() {
  @Override
  public void run() {
    Toast.makeText(getApplicationContext(), e.getMessage(), Toast.LENGTH_SHORT).show();
  }
  });
}
The above code does the following:
- Start a Coroutine Scope
- Try to call the
XpayUtils.getTransaction()and if successfull call theupdateTransaction()function with the response which updates the view with the transaction info. - If an error occured, call the
displayError()function to display the error message in a toast.
Try to run the app again and make a card payment using the testing credit card information found here
After getting a response message from the server close the web view, you will be navigated to TransactionActivity and you will see the latest transaction information. you can compare the status value with the message you got in the web view.